Lovely Lattice Stamp Set meets Stampin’ Blends

Lovely Lattice Stamp Set meets Stampin’ Blends

One of my favorite “Freebie” choices from the 2019 Sale-a-Bration (going on now through March 31) is the stamp set “Lovely Lattice”. And when it’s brought to life through the magic of Stampin’ Blends, well… now there’s a match totally made in heaven!

Lovely Lattice – Choose this stamp set for FREE with a $50 product order during Sale-a-Bration 2019. (Thru March 31, while supplies last.)

I was almost sad to see this card completed. Coloring in an outline image isn’t all that far off from the days of crayons and coloring book pages – elements of a relaxing past-time I have never really outgrown. So when my eye warned “That’s enough, Lynda; it’s done”, my heart wasn’t quite ready to cooperate. Nevertheless, I reluctantly put down my grown-up crayons and tended to final assembly.

“You can never have too many flower sets (in your stamp collection).”

– Lynda Glassmoyer

Those who know me, know I’m a sucker for flowers. And it certainly shows in my stamp collection! But why not? Flower images are appropriate for (almost) any card-giving occasion, and in this case, I didn’t even have a concrete idea yet for where this card was headed. I had no one specific in mind to receive it, and figured I’d just leave the outside free of any particular sentiment that could limit its use later on.

Getting the look

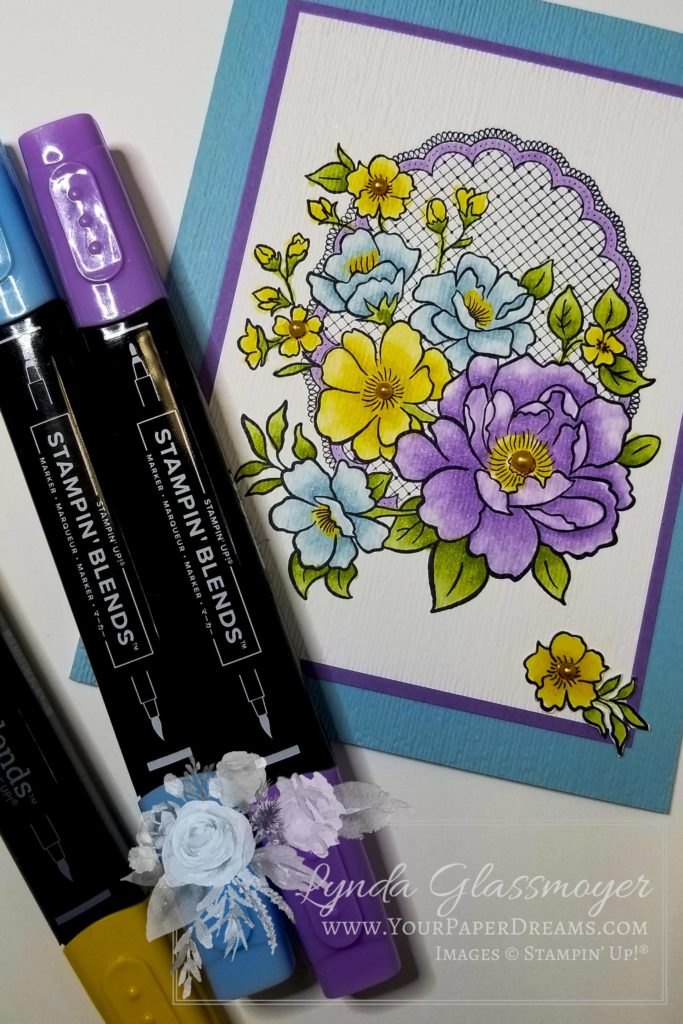
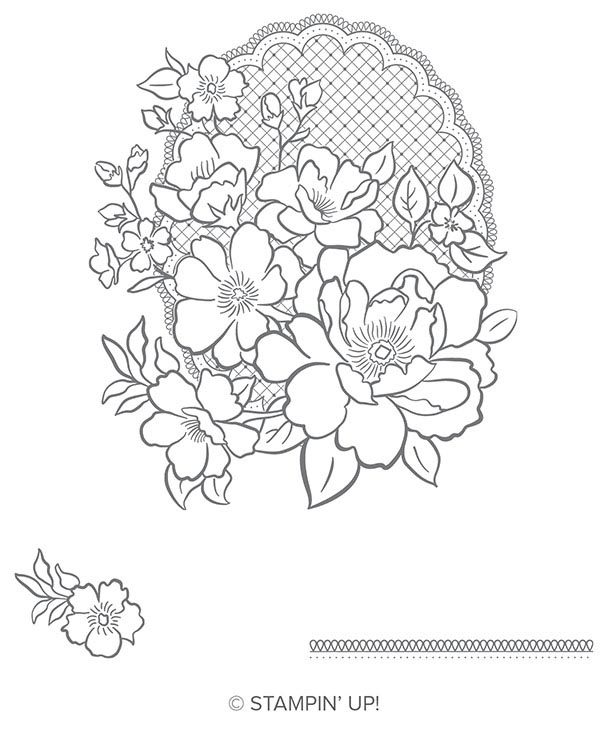
I began this card by stamping the largest image in the stamp set with Memento Tuxedo Black ink – onto Whisper White cardstock. And then used Stampin’ Blends in both light and dark shades of the following colors to bring it to life:

And a little touch of Pumpkin Pie in some of the flower centers. Then I created the highlights with the Stampin’ Blends Color Lifter.

Lovely Lattice colored with Stampin’ Blends

At this point, I realized a touch of dimension seemed in order. So I took that entire stamped & colored layer and ran it through the Big Shot inside the “Subtle” embossing folder. (BTW, that folder is right up there near the very top of my faves at the moment!)

3D Dynamic Textured Impressions Embossing Folder – “Subtle”

Then I added the same embossing to the front half of the Balmy Blue card base. I mounted the stamped & embossed layer onto an un-embossed layer of Highland Heather, and then adhered those layers onto the card base. The textural difference between embossed layers and those without embossing seemed to strike just the right contrast.

The final details

But it still needed just a bit more dimension. So, grabbing one of the Pumpkin Pie Stampin’ Blends, I quickly transformed a few “plain-ol‘-white” pearls into coordinating flower centers and added those to some of the flowers.

And that little flower down in the lower right corner? It was stamped onto a scrap of Whisper White cardstock, colored in with the same Blends markers, and then fussy-cut and positioned for visual balance.

Did you know that if you were to order all the Stampin’ Blends I’ve use here, and toss in the “Subtle” embossing folder, you’d qualify to get this lovely stamp set for free? Get all the goodies here.

Featured products

Handmade Valentine Card – then & now

Handmade Valentine Card – then & now

Remember the days of childhood when it was so much fun to make a handmade Valentine card? You’d drag out the construction paper, scissors, and paste, and create something really special straight from your heart, right? Well, that’s exactly what we were recalling as we assembled this card at last month’s card classes!


Handmade Valentine Card – Grown-up Version

For all the color, texture and layers going on with this card, it’s deceptively simple to make… although not necessarily quick to assemble. Actually, it might be the type of card you’d choose to put together while watching TV, so your mind could focus on something other than gluing hearts down in place. Again and again.

The colors featured on this card are Blushing Bride and Bermuda Bay – which together, make up one of my favorite color combos.

Oh! Wait! Um, let me try that again…

ANY color that coordinates and combines with Bermuda Bay represents “one of my favorite color combos“, lol! But yep, this is indeed one of my regular “go-to” combos.

And can you believe that everything, with the exception of the ribbon, was created with just one die set: the “Be Mine Stitched Framelits Dies“?!?

Be Mine Stitched Framelits Dies

So it’s all pretty simple, actually.

It starts with die-cutting all the pieces and then laying them out to dry-fit. (The two Blushing Bride lengths of hearts near the bottom are actually one piece put thru the Big Shot and then carefully trimmed into 2 sections with Paper Snips.) Once you’ve got that done and everything’s laid out to your satisfaction, it’s time to anchor everything down. My adhesive preference for this step is Multi-purpose Liquid Glue, applied in tiny amounts at a time, to the back of each die-cut element using a small piece of scrap-paper as an applicator.

“When it comes to applying glue, less is more.”


Reminder words repeated ad nauseam at most of my card classes.

But basically, that means that less glue not only dries faster, it also leaves fewer smears on your project, fewer sticky fingers, and overall less mess and frustration. And then a happier papercrafter.

Finally, you may want to add some Wink of Stella shimmer to the small solid hearts. It’s my philosophy that you can never have too much shimmer and shine.

Do you have a memory of making Valentine cards as a kid? If so, please share your recollections in the comments.

Download February’s Wallpaper/Calendar

Download February’s Wallpaper/Calendar

Pink! One of my favorite colors – and certainly at THIS time of year! If you’re as ready as I am to finally lay eyes on some pretty flowers, well here ya go! February’s wallpaper/calendar is ready to download and install on your computer monitor.

February’s Wallpaper/Calendar

My monthly desktop wallpaper background offers you a pretty seasonal picture to brighten your computer monitor. But that’s not all; it also includes a handy monthly calendar and serves as a cheat sheet reference to websites you may want to know about and visit.  And it’s even FREE, so please don’t hesitate to share this page with your friends and family.

Download February’s wallpaper to your own computer:

Click HERE to download your FREE background & calendar.

You’ll probably want to consult your own computer operating system’s installation instructions, but installing the background image on my Windows 10 system takes just 3 quick steps – and less than a minute. It’s super-duper easy-peasy!

  1. Download and save the image to your computer – from the link just above that starts with “Click HERE”. (NOT from the picture that appears with this post!)  TIP:  To “download” the full-resolution image once it’s open (from Google Drive where it’s stored), click on the downward-pointing arrow. THAT is what actually begins the download process to your computer.
  2. Once the file has been downloaded, named and saved to your computer’s hard drive, open the image.
  3. Then right-click on the image and select “Set as” > “Set as Background”….. then right-click again and select “Set as” > “Set as Lock screen”. And poof! That’s all there is to it! (For convenience, I recommend you install this on both your desktop system as well as your laptop.)

More tips:

And in case you may have an operating system OTHER than Windows 10, these tips may help with installation:

Finally, please keep in mind that the format of my monthly picture is designed for most modern-day 16:9 monitors (a common format for monitors and HD TV’s since about 2009), oriented in landscape format. (1920 x 1080 pixels.) If you’re working with an older monitor (one that is more square-ish in format), or your monitor is set up in portrait format, the picture will probably not work for you. Sorry ’bout that.

Sale-a-Bration (SAB) – Perk #2 – Hosts & “I Deserve It” orders get extra Stampin’ Rewards!

Sale-a-Bration (SAB) – Perk #2 – Hosts & “I Deserve It” orders get extra Stampin’ Rewards!
2019-SAB-Botanical-Butterfly-DSP-800b

Welcome to the 2nd in my series of 3 posts detailing the perks of Stampin’ Up!’s “Sale-a-Bration 2019”! (Yes, that’s another example showcasing the Botanical Butterfly Designer Series Papers, which are available as a freebie choice with an order of $50, along with the super-popular Butterfly Duet Punch).

In my last post I discussed the Sale-a-Bration perk that everyone seems to be most familiar with: getting to choose a free product with each $50 you order. But the perk we’ll refer to in THIS post is pretty doggone sweet, too!

So, you probably know (or at least I HOPE you know) that Stampin’ Up! offers a rewards program for those who gather a few friends together and host a group stampin’ event. (Call it a party, call it a class or call it something else, Stampin’ Rewards will be part of it if there are sufficient qualifying sales.) Typically, when combined orders from such an event reach $150 in product sales, those rewards (called “Stampin’ Rewards”) kick in for the host.

At $150 in total product sales, the host can select most any product of her choice equal to 10% of the sales (which would be exactly $15, if the total product sales were $150, for instance). And as the total product sales increase, the percentage levels of Stampin’ Rewards increase too, until they ultimately reach 16% of the total product sales. In addition, when sales cross the $450 line, the host can also get any one item of her choice for half-price! (Big Shot, Color Family of ink pads, or Stamparatus, anyone?)

But Stampin’ Rewards are enhanced during Sale-a-Bration…

…making it a perfect time to host an event – or else submit what some like to call an “I Deserve It” order (of $150 or more for one’s own self). “I Deserve It” orders are a great way to maximize your purchasing dollars, and the bigger your order, the more freebie goodies you can choose!

So not only is it a smart plan to group your personal orders into batches that qualify for Stampin’ Rewards (starting at $150 in product sales), but it’s particularly clever to do so during Sale-a-Bration! That’s because in addition to your usual Stampin’ Rewards (see the Party Sales chart in any of our catalogs – sometimes near the back; sometimes near the front), you may also qualify for ADDITIONAL Stampin’ Rewards!

Which brings us to… SALE-A-BRATION PERK #2:

Sale-a-Bration Perk #2 offers an enhancement to the usual Stampin’ Rewards plan! During Sale-a-Bration, whenever your total product order reaches $250, Stampin’ Up! throws in an additional $25-worth of credit you can apply towards your freebie product as a “host” – over and above what a $250 sales volume would ordinarily qualify for! So here’s an example of how that would work in real life:

Let’s say your “party” total (regardless of source) reaches $250 in product sales. Under the usual, year-round plan, your Stampin’ Rewards would be figured at 10% of $250, which would equal $25 credit towards additional product of your choice. But during Sale-a-Bration, Stampin’ Up! will kick in that additional $25 in Stampin’ Rewards credit for any “party” of $250 or more! So that means if you reach the $250 level exactly, you’d get the usual $25 in Stampin’ Rewards credit, PLUS the additional $25, for a total credit of $50 you can apply towards any current additional product!

Oh, but wait!!! If your $250 order was actually all YOUR order, then each $50 segment would *also* qualify for one of the free SAB items in the SAB 2019 brochure!

Yes indeedy, we DO love to let you double-dip in the Stampin’ Up! perks whenever possible! 🙂

So should you find yourself staring at a particularly long wish-list at this time of year, give that clever concept a bit of thought. Qualifying for Stampin’ Rewards with your order is nothing to sneeze at!

And stay tuned for the final installment of this 3-part series – explaining how to get what might be the absolute BEST deal of ALL with Stampin’ Up! during Sale-a-Bration! We’ll call that PERK #3……. and I’ll show you some extra, totally-legit, double-dipping ideas tossed in for added fun!

Sale-a-Bration (SAB) – Perk #1 – Customers get FREE product!

Can you name all 3 (4, actually) ways that a papercrafter can benefit from the perks of Stampin’ Up!®’s annual Sale-a-Bration (SAB) season?

2019-SAB-Botanical-Butterfly-DSP-800

If you’ve been around the Stampin’ Up! community for very long, I’ll bet you can name at least ONE of the perks. But be sure to follow this week’s series of 3 posts, so you don’t accidentally miss out on the *other* 2 (3, actually) available perks, too!

Let’s begin by reviewing a bit of SAB history (that is, as far as my memory recalls…), and then we’ll touch on what (I think) is probably the most well-known feature of Sale-a-Bration. 

I wish I could tell you exactly when this fun tradition began in Stampin’ Up!, but I don’t exactly know. What I DO know is that “Sell-a-Bration” was already going on back 23 years ago (in January of 1996), when I first became acquainted with the company. But although it was an exciting time of year way back then, the format wasn’t even close to the generous SAB season we are familiar with nowadays. The way I remember it as a brand-new customer, is (I think) we could choose a stamp from a unique collection (note: a small, single wood-mount stamp) – for a dollar. I remember being really excited about getting that additional bonus with my order, and I chose a teddy bear. (I even got to take that stamp home with me that night!) And I know I’ve come across that stamp from time to time throughout the years, so it MIGHT still be in my collection of stamps that are deeply buried in storage somewhere.

Through the years, the name “Sell”-a-Bration morphed into “Sale”-a-Bration, and the perks evolved, too. In general, they’ve become more generous over time (especially compared to that year when you could buy a small stamp for only $1!), but it’s always been the biggest season of the Stampin’ Up! year, and a whole lotta fun!

SALE-A-BRATION PERK #1:

So for *my* stampin’ peeps over the years, certainly the most popular attraction has been getting their choice of free product (usually) created for, and available exclusively during, that season.  For a long, long time now, there has been the opportunity to choose one such special item with each $50 product order placed. And for the past few years, there have also been some bigger choices included, too – for product orders reaching $100 or more. (Examples this year include the “Tea Time Framelits Dies“, which coordinate with the gorgeous stamp set “Tea Together“, shown on page 49 of the Occasions Catalog. And don’t overlook the Distinktive stamp set called “Lasting Lily“, if you’ve had some experience with the line of Distinktive stamps. Btw, in case you might be admiring the “Tea Time Framelits Dies”, but also have other  SAB freebie items on your wishlist, we’ve been notified that that set of dies will carry over beyond the Sale-a-Bration season – but of course it’ll have a price tag attached to it once it does, lol.)

Anyway, certainly my stampin’ friends have found Sale-a-Bration to be a great time to make some of their major investments in tools or pricer products, OR to replenish basic supplies that may have been starting to run a little thin during the past year.

But here’s yet another tip you’ll want to take into consideration when planning your Sale-a-Bration order(s):

Sale-a-Bration items are available on a “while supplies last” basis. (Yeah, yeah, yeah, you’ve heard me preach this before, haven’t you?) But it’s true, and in recent years, the deeper we get into the SAB season (which ends on March 31, btw), the smaller the inventory of choices has become. So I doubt that the full inventory of choices will be available to those who wait until later in the season to submit orders. So my advice will always be to place your orders early in the season, especially until you’ve earned all your most favorite freebie choices. 

Whew! But all that said, did you also notice this statement that appears on the inside cover of the Sale-a-Bration brochure? “Watch for another set of exclusive FREE items coming February 15!”

So take another look through your Annual and Occasions catalogs, along with the SAB brochure, and see what’s fresh and new that you’d love to work with this Spring!

Spring Catalog, Sale-a-Bration, and Cling Stamps

Butterfly birthday
Well, Happy New Year! And along with that, Happy New (Occasions/Spring) Catalog, and Sale-a-Bration 2019!

I'll be offering more about the Occasions/Spring Catalog and Stampin' Up!'s long-standing Sale-a-Bration tradition in the coming days, but today I wanted to share a bit about Stampin' Up!'s new "Cling" stamps, which you may have already noticed in this brand-new catalog.

Yes, we can once again put labels on our temporary-mount red rubber stamps AND expect them to stay in place on the acrylic blocks or Stamparatus! Something I know many of you have been awaiting for a long, long time! 

So here's the basic low-down on some of the changes you'll notice in the Occasions/Spring Catalog…

Going forward, *new* stamp designs in red rubber will be known as "Cling" stamps, and the terms "Clear Mount" and "Clear" will be retired (I'm speaking of *new* designs, that is).  As you look through the new Occasions catalog you'll notice that stamp designs will generally be available in either the new "Cling" style or "Photopolymer", as we've had for several years now. And with only a few exceptions, Stampin' Up! will be phasing out wood-mount sets… although ongoing sets will continue to be available in the current Annual Catalog until it is replaced this June. 

20190103_134717

But fear not, those of you classic stampers who favor traditional red rubber images! The red rubber and foam elements aren't going away; only the wood blocks and the concept of "permanent mount" are being retired. Why? Because only a small minority of modern-day stampers are opting to order wood-mounted stamp sets these days – due to the increasing cost of raw materials and the fact that they take more room to store.  So these new "Cling" stamps will feature exactly the same red rubber (for the crisp detail you have come to expect and love), but the foam layer appears to me to be a little "whiter", and – most of all – ready to accept the corresponding label, which will actually CLING to your acrylic block (or Stamparatus) until you're ready to remove it! So all the best features of red rubber are being retained, PLUS we'll be able once again to attach the image labels to our stamps! (Hey,  now it hasn't really been all THAT bad, has it; the "no-labels" practice of recent years just taught us all how to read backwards when selecting a stamp without its image label attached, lol. Good exercise for our aging brains, right?!?)

So here are some things you'll want to know about the care and feeding of your new cling stamps:

  1. The case will look very familiar, with the front showing each image, as usual.
  2. 20190103_134543
  3. The inside left will show (in diagram form) how to assemble your new stamps. (Updated diagrams, but if you've used Stampin' Up! stamps in the past, there's really not too much new about assembling them.)
  4. Be sure you understand how to remove these assembled cling stamps from their case, acrylic block, Stamparatus, etc. Because the labels are SO sticky, it is highly recommended that when it's time to remove the stamp, you carefully get something underneath a corner (such as your fingernail, mini-spatula end of the "Take Your Pick" tool, or perhaps you might want to slip a Post-It Note or piece of painters tape underneath a corner when mounting it to the block in the first place – so you can use that as a peeler-upper handle. Since I have fingernails I've not had any problems carefully and gently peeling the stamp up from its corner and ensuring that the label's coming off with it, but I suspect that could pose a challenge for those who may have shorter nails. So go ahead and think in advance about how you'll handle the "removal" step to avoid any "oops'es" with your stamp.  
  5. In the recent past many of us (myself included) have kept the outer section (scrap piece) of the die-cut rubber, and adhered it to the inside right half of the case as a frame for each stamp, so that we could tell at a glance which stamp(s) might be missing from the set. But it's no longer recommended that we do that because – IF YOU JUST CARELESSLY YANK ON A CLING STAMP TO REMOVE IT FROM EITHER ITS CASE OR AN ACRYLIC BLOCK (OR STAMPARATUS), IT'S ENTIRELY POSSIBLE THAT A LAYER OR TWO OF THE STAMP MAY RIP OFF IN YOUR HAND, WHILE LEAVING THE SUPER-STICKY "CLING" LABEL BEHIND! So don't be a "yanker"; remember to take an extra moment to peel up carefully from a corner!
  6. Ok, so if we're not going to use the scrap rubber-frame trick anymore, how WILL we keep track of which stamp(s) might be missing from the case before we put it away? Well, here's what I'm doing these days. When I open and assemble a new set of cling stamps, I remove the insert from the front cover and make a copy on my all-in-one printer. Then I replace the original in the front of the case, and trim the copy and insert it back into the right-hand side of the case, so it's visible from inside the case. (It will look just like the front of the case.) And then I attach my assembled stamps right on top of their corresponding images, and now I can tell at a glance which stamp might be missing! 20190103_134620
  7. Finally, to maintain maximum "cling", do keep your stamps (and their labels) clean of dust, pet fur, hair, etc. Rinse with water or Stampin' Mist, or use a mild detergent if necessary. But please, nothing harsh, including no Stazon Cleaner on the labels, if you want to preserve their cling-ability!

Now go pick your favorite designs from the Occasions Catalog, and order 'em up at: store.YourPaperDreams.com

January 2019 wallpaper/calendar is ready to download

January 2019 wallpaper/calendar is ready to download
2019 - 1 - January - tinified
Can you believe I’ve been creating these monthly desktop wallpaper/calendars for nearly 2-1/2 years now?!? As we enter another year I found it a little stunning today to realize just how many of these I’ve done!
 
This is my 3rd January image, but I’ve found that every year January’s has always seemed difficult for me. Christmas, with all its warm and embracing colors, is now behind us, and while the days are just beginning to get a little longer, the sky is too often dark and brooding. It’s very cold, and there is still a long, long ways until spring flowers make an appearance. Nevertheless, I always like to think that things ARE moving in that direction, and my heart urges me to acknowledge that.
 
So this month I have chosen an image that recognizes it’s still definitely “cold season”, but the stream is active, rather than frozen solid. And the sun shining through the trees offers a glimpse and hope of brighter days to come. All of which makes me smile.
 
I do have to share one note regarding the URL for the Occasions Catalog, however. Please note that the URL for the Occasions Catalog (PDF) listed on the image will not actually be active until sometime on January 3rd, because that’s when the 2019 Occasions Catalog actually goes live. So while you’re free to download and install the image now, please don’t try to use that URL until (sometime on) the 3rd. (“Sometime” depends on when I get around to updating it, lol.)
My monthly desktop wallpaper background not only offers you a pretty seasonal picture to brighten your computer monitor, but also includes a handy monthly calendar, and serves as a cheat sheet reference to websites you may want to know about and visit.  And it’s even FREE to download and install, so please don’t hesitate to share this page with your friends and family.
 
 
You’ll probably want to consult your own computer operating system’s installation instructions, but installing the background image on my Windows 10 system takes just 3 quick steps – and less than a minute. It’s super-duper easy-peasy!
  1. I download and save the image to my computer – from the link just above that starts with “Click HERE”. (NOT from the picture that appears at the top of this post!)  TIP:  To “download” the full-resolution image once it’s open (from Google Drive where it’s stored), I click on the downward-pointing arrow. THAT is what actually begins the download process to my computer.
  2. Once the file has been downloaded, named and saved to my computer’s hard drive, I open it.
  3. Then I right-click on the image and select “Set as” > “Set as Background”….. then right-click again and select “Set as” > “Set as Lock screen”. And poof! That’s all there is to it! (For convenience, I install this on both my desktop system as well as my laptop.)
And in case you may have an operating system OTHER than Windows 10, these tips may help with installation:
 
Finally, please keep in mind that the format of my monthly picture is designed for most modern-day 16:9 monitors (a common format for monitors and HD TV’s since about 2009), oriented in landscape format. (1920 x 1080 pixels.) If you’re working with an older monitor (one that is more square-ish in format), or your monitor is set up in portrait format, the picture will probably not work for you. Sorry ’bout that.

Art by you – Kathy A – Dashing Deer

20181209_085627

One of the many fun perks of being a Stampin' Up! demonstrator is receiving hand-stamped cards and projects from one's stampin' friends. While I've always had good "intentions" of sharing such stamp art here, I admit to having been less than successful in actually getting it done. So at least for this Christmas season, I'm going to redouble my efforts to share your art as it arrives in my happy mail!

This card was the first one I received this Christmas season. Kathy A. has been a long-time stampin' friend, and I admire her for getting handmade cards out every year, even on those years I send out either very few or none. (Which has unfortunately been several years in a row now.) This year, for her main element, Kathy has chosen the bundle (stamps + dies) "Dashing Deer". So the stamped and die-cut deer comes from that bundle, as do the sentiment and flowers. Colors are Cherry Cobbler, Basic Black & Very Vanilla. I particularly like how Kathy layered the 2 circles behind the deer; such a simple, but nice background effect!

And did you notice the fabulous 2-toned swirl effect on the deer? That magic comes from the stamp itself; it's how it's designed and cut! Look for an increasing number of stamps from Stampin' Up! that feature similar multi-toned effects as we go forward! I just love that magic effect; talk about making you feel like an artist!!! But lest you think you've missed out on getting this pretty set of stamps & dies for yourself, well, you're in luck. Because although the special bundle pricing will soon end, both the stamp set and dies set will be held over at least into the spring, and will continue to be available at my online store!

Thank you, Kathy, for thinking of me this season, and for your lovely card!

December card classes: Bring-a-Friend Day!

Marketing Collage

I'm excited to share that this month not only will our card classes be held on a different day of the month (because our normal "4th Tuesday" falls on Christmas Day and I just kinda suspected that might mess with our attendance numbers), but we're also introducing "Bring-a-Friend Day", and offering FOUR different format options!

So if you're anywhere within driving distance of Coeur d'Alene, ID, take a look at these various format options, choose which one will best fit you (and your friend), and come join us on December 11th for our final stampin' push before Christmas! As usual, you've got 2 sessions to choose from – morning or afternoon. 

And here are the 4 class formats to choose from this month:

  1. Make up to 20 Christmas cards with coordinating envelopes from the lovely Stampin' Up! Christmas project kit "Timeless Tidings". (Examples featured above.) Purchase the kit yourself at http://bit.ly/BuyTimelessTidingsKit (preferably by no later than Dec. 4th), use my stamps, inks and other supplies (but you provide your own SNAIL adhesive, which you can purchase at class), and pay only one $5 class fee – which will cover BOTH you and your friend! You and your friend can each purchase your own individual kits (so you can each make 20 cards) -  or you can split one kit between you. Your choice. But either way, be sure to order your kit(s) SOON – kinda like today or tomorrow – so they can (hopefully) arrive before next Tuesday's class!
  2. Choose and make a handful of cards (with envelopes) from my "Card Buffet". In addition to several individual designs from the Timeless Tidings project kit, I'll also have several other fairly simple Christmas card designs to choose from. All supplies included except SNAIL adhesive. Pay by the individual card ($1.75 each, which is less than half the usual per-card class price.) Note: Depending on how many card kits are available and how many people show up, there might be a limit to how many cards each person can make.
  3. Place an order of $40 or more in product (at my online store), apply the current host code (found at hostcode.YourPaperDreams.com), and make your first 6 cards for free. store.YourPaperDreams.com (Hey, does this one sound familiar? It IS! It's one of the standard pricing choices at my monthly card classes.)
  4. Got a craft project deadline coming up? Bring your own Stampin' Up!-based project to work on (and your own supplies), pull up a chair and a section of table and hang out with us! Finish up your Christmas Cards, work on gifts & stocking stuffers, or whatever! As long as your project is based on Stampin' Up! products, that's cool. $5 donation to the church for your seat (and heat). 

So grab a friend and come join the fun! The projects will be easy, and the pricing will be, too. But better hurry and claim your seats while there's still best selection of session times and format. 

December 2018 Wallpaper/Calendar is ready to download!

 
2018 - 12 - December  - tinified
 
Yep! It's really here. December. And personally, I'm feeling pretty excited! Truth is, if you've been following me for a while you'll probably understand why it's been four years since I've had space in my life to participate in the festivities of the season. But although I'm still approaching this year's decorating season with a generous buffer of caution, I am at least thinking about putting up a tree this year, and even stringing some outside lights! It's been a long time since I've been able to even *contemplate* that kind of stuff, but I admit to feeling a bit hopeful that this – Just. Might. Be. The Year!
 
Oh! And would you be surprised to learn that the colors in this month's image are the colors I decorate with? I adore my fantasy sugarplum theme – on a white tree. Pure happiness! 🙂
My monthly desktop wallpaper background not only offers you a pretty seasonal picture to brighten your computer monitor, but also includes a handy monthly calendar and serves as a cheat sheet reference to websites you may want to know about and visit.  And it's even FREE to download and install, so please don't hesitate to share this page with your friends and family.
 
 
You'll probably want to consult your own computer operating system's installation instructions, but installing the background image on my Windows 10 system takes just 3 quick steps – and less than a minute. It's super-duper easy-peasy!
  1. I download and save the image to my computer - from the link just above that starts with "Click HERE". (NOT from the picture that appears at the top of this post!)  TIP:  To "download" the full-resolution image once it's open (from Google Drive where it's stored), I click on the downward-pointing arrow. THAT is what actually begins the download process to my computer.
  2. Once the file has been downloaded, named and saved to my computer's hard drive, I open it. 
  3. Then I right-click on the image and select "Set as" > "Set as Background"….. then right-click again and select "Set as" > "Set as Lock screen". And poof! That's all there is to it! (For convenience, I install this on both my desktop system as well as my laptop.)
And in case you may have an operating system OTHER than Windows 10, these tips may help with installation:
 
Finally, please keep in mind that the format of my monthly picture is designed for most modern-day 16:9 monitors (a common format for monitors and HD TV's since about 2009), oriented in landscape format. (1920 x 1080 pixels.) If you're working with an older monitor (one that is more square-ish in format), or your monitor is set up in portrait format, the picture will probably not work for you. Sorry 'bout that.