Guest Artist – Watermelon Mini Treat Bag

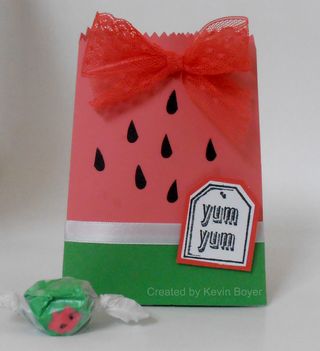
P8060056Kevin Boyer has earned a reputation as an excellent stamping party and class host, and I suspect one of the ways in which she encourages awesome attendance is the darling handmade favors she prepares for everyone! Last month I had the privilege of gathering with Kevin and her friends again for a card-making class while I was visiting back on Whidbey Island.

For that event Kevin had picked a watermelon theme for her favors – using the new In Color "Watermelon Wonder", as well as various watermelon-flavored candies and gum. The main bag is cut with the Mini Treat Bag Thinlits Die, ribbon is 1" Dotted Lace Trim, and the darling seeds are actually punched hearts cut in half! (The heart punch, white ribbon, tag punches and "Yum Yum" stamp are retired, but sure still work well here…. and I think the green and lighter pink are also retired cardstock colors, as well. Guessing at Strawberry Slush and…..??????)

Thanks for yet another awesome party and take-home favor, Kevin!

Product List

Small Heart Punch

Small Heart Punch
[117193]

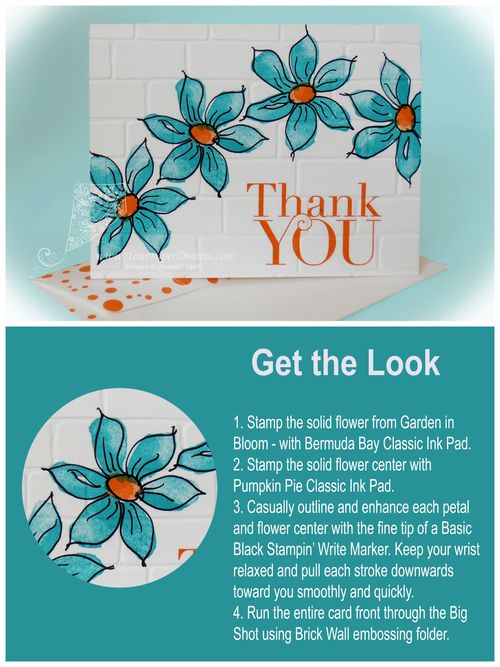
Garden in Bloom meets Freehand Drawing

Garden in Bloom meets freehand tutorialHere's a fun way to get a big bold look in practically no time at all! I'm loving the new THICK Whisper White cardstock these days – for cards that stand bold and proud on their own, without having to use multiples layers of cardstock to give them some heft. So this one was literally just stamp, outline, and emboss. Done!

Limiting the colors to just 2 keeps the attention focused right where you want it….. on the images and your freehanded line work.

Don't forget to use a Stampin' Pierce mat under your paper when stamping with Photopolymer!

Product List

Monochromatic Welcome Cards

P8060057-web

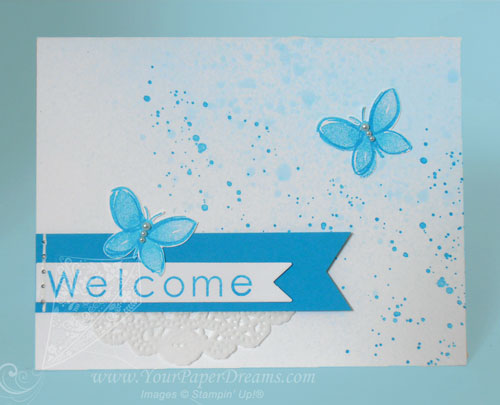
Today I've been working on welcome cards for some new team members. Since Tempting Turquoise is our Paper Dreamers' team color, my welcome cards always feature that color – usually in a monochromatic theme.

For today's cards I started by spritzing a rubbing alcohol & ink-refill combo onto a section of the card…. deliberately leaving the upper left corner white to give the overall look some intentional "white space". That dried pretty quickly, and then I added the more distinct spatters with Gorgeous Grunge. The 2-step butterflies (from Garden in Bloom) were stamped onto another piece of Whisper White cardstock and then fussy-cut to maintain their true white backgrounds. Faux stitching anchors the end of the banners and self-adhesive pearls finish off the butterflies.

Here's how I got the "Welcome" letters aligned.

 Product List

Birthday gift wrapping

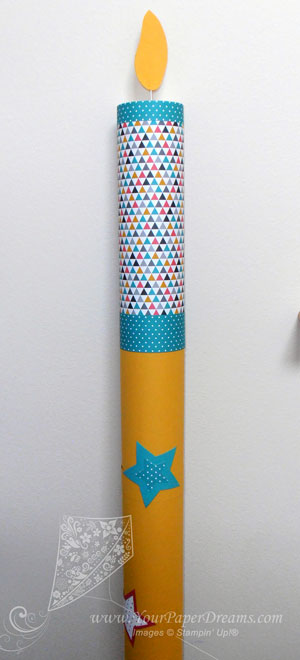
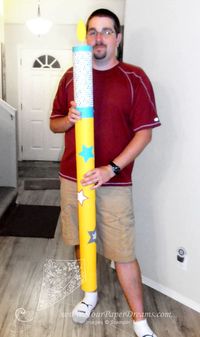
P7060014So what do you do when it's time to wrap a birthday gift that measures 4' long by about 2-1/2" wide? Well I had to think about this long and hard before finally coming up with this idea!

Much of my inspiration came from the fact that my son is a volunteer for the American Red Cross and had spent many hours this past week working at several evacuation shelters put in place due to the many fires in the area. In fact, he'd missed all of the family's 4th of July activities, and then most of his birthday the following day. So I suppose it was "fire" on my mind that led me to this giant candle – made almost entirely from Stampin' Up! supplies.

I began by fashioning a long cylinder constructed from the white backing sheets that come in most of the Designer Series Paper packages. And in the process, fell in love with our new "Tear and Tape Adhesive", btw!

Once the cylinder was the proper length I made a top and bottom by tracing the openings and clipping an oversized circle of the same white backing board inwards to that pencil line, folding each tab downwards for a custom fit. I anchored the top one in place with scotch tape and then inserted the gift from the bottom and closed up that end the same way.

Then starting at the top again, I wrapped a combination of Designer SeP7060016---desaturated-background---web---crries Papers (12 x 12) and several full sheets of cardstock down the length of it, and ultimately added stars cut with the Stars Framelits. I drew and cut two layers of "flame" and glued the upright section of a bent piece of white florist wire between the two layers, taping the other section to the top of the tube.

I think David was amused and intrigued, but obviously uncomfortable when I had to go and spoil the moment by grabbing the camera, lol! 

But I was pleased to see that he had immediately noticed the card repeated the same "candle" theme – with the same colors and prints. (The finer points of having grown up in a Stampin' Up! household!!!)

But eventually the moment arrived that I'd been dreading: how to remove the gift without destroying the package? Ultimately I suggested he use a knife and cut just around the inside perimeter of the bottom, and that allowed him to slip the gift out without destroying the "packaging".

So now the question is:  a whole day later now, have his 2 little kiddos completely destroyed the candle themselves yet?

Transitioning – MyDigitalStudio (MDS) to My Memories Suite (MMS)

Screenshot - MDS to MMS transition graphic
Well, I did it. Started the process of transitioning from MDS (MyDigitalStudio) to MMS (My Memories Suite).

I hadn't planned to undertake this quite this soon after the demise of MDS, but back in January I upgraded my computer from Windows 7 to 8.1 (which basically meant starting over with a clean computer and having to reinstall EVERYTHING), and then just a couple weeks ago I suffered an error that necessitated resetting my computer…. meaning I lost and have had to reinstall all my applications software for the *2nd* time this year. I never HAD gotten all my hundreds of MDS digital downloads reinstalled after the operating system upgrade of 5 months ago, and then after losing my apps again recently (including MDS, of course), I officially threw up my hands and decided it was time to make the transition. So far I've only installed Version 5 of MMS (which is being offered for free to current MDS users for a limited time), and I've begun the process of installing and merging my digital downloads.

My Memories Suite is also offering their newest version (Version 6, published last fall) at half-price (only $19.99) for MDS users, and I expect to take advantage of that reasonably soon, too. Version 6 will bring me closer to the features I was accustomed to in MDS, which I'm realizing more and more truly WAS the best program out there for non-professional digital designers. Sigh….

So today I wanted to share a few tips I've learned along the way for making the transition.

  1. You'll need MDS installed on your system…. although it doesn't need to be the most recently updated version.
  2. Locate the license key for your MDS. From within the program, go to: HELP > ABOUT MDS > SUPPORT. Write it down so you'll have it handy if/when asked. 
  3. You'll need a basic working knowledge of how to get around your computer – i.e., how to dig around in your computers files, how to copy and paste, and move files and folders from one place to another. If you don't have the confidence to do those types of things yourself, borrow someone who does.
  4. If you had digital downloads already installed for MDS, you'll need to know or learn how to find them and relocate them for use with My Memories Suite.
  5. If you had purchased and downloaded ("saved") digital downloads, but had NOT yet installed them for MDS, you'll need to know where they are on your system.

Once you're ok with all that, you can begin the transition. Up first, you'll probably want to install My Memories Suite – Version 5. As an MDS user, you can get it for FREE here. That same page includes information and instructions regarding migrating your current MDS content (aka "digital downloads") and your projects. Be sure to read everything on that page (scroll down; there's a LOT of info there) so you'll have an idea how this will all work.

I found that the migrating instructions and screen shots did not match exactly what happened with my computer (perhaps because I have 8.1?), but I had enough background and experience to figure it out. But that's where you'll want to bring in someone with computer experience and confidence if YOU feel uneasy following the steps they've laid out.

Their instructions only cover what to do if you already have your digital downloads installed for MDS. In my case, because of my computer set-backs this year I do NOT have all my downloads installed anymore. So while obviously I COULD install them to MDS and THEN migrate them to MMS, I figured that would just add an extra step. So I was pleased to figure out how to install them directly for use with MMS….. and that's what I'd like to share here.  (Note: I have a Windows machine, so these tips are for Windows.)

  • Begin the install process as usual, but when it asks for the application folder where you'd like the digital resources installed, "Browse" upwards in folder hierarchy (3 steps up on my computer, but yours might be different) until you find "Program Files (x86)" or "Program Files" (whichever one pertains to your current My Memories Suite program).
  • Choose the appropriate option (you may have to double-click), and then double-click "My Memories Suite".
  • Confirm that the file name at the bottom of the window now looks similar to this: "c:Program Files (x86)My Memories Suite". If so, go ahead and "select" to confirm.
  • On the subsequent screen, select (highlight) "c:Program Files (x86)My Memories Suite" from the list and click NEXT to begin the install.
  • Click FINISH when the installation is complete.

Once installed, continue following the migrating content instructions . But THEN, once your "Punches" and/or "Stamps" folders have been renamed and merged accordingly, your old Punches and/or Stamp folders may still remain in the MMS Components folder list. As long as the files appear correctly within the "Shapes" and "Imprints" folders you can go ahead and delete the extraneous Punches and/or Stamps folders from the Components folder of MMS. (But leave them alone in the Components folder of MDS!)

I haven't worked with MMS all that much yet, but I am pleased that there it a great similarity with MDS. It's got the same overall screen layout, and most of the same functions. So except for having to learn new icons and a few new terms ("Shapes" vs "Punches", and "Imprints vs Stamps"), and practice ignoring the somewhat distracting colors on the screen, I think the transition will be fairly benign once I forge forward. It's certainly a step backwards from what I've been used to with MDS, but not as far back as I was worried it might be!  
What a difference an “H” makes

Picture this:  It's the night before last week's card classes, which happen to be the day before my big Crafter's Garage Sale. Of COURSE there aren't enough hours left to get everything done that I need to (or should I say, "want to") do for both events, but I'm perking along finishing up the design for my final card, and then will only have to cut and package the supplies for it. A quick glace at my watch encourages me – thinking I'll probably even have time for a decent period of sleep if I can keep up the pace.

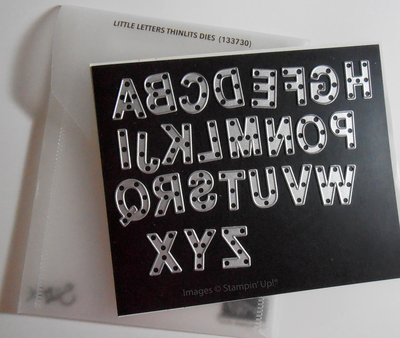
And then it happens. That pesky set of 3/4" dies that I adore and hate at the same time…. does it again. One of the "Little Letters Dies" hits the floor in my workroom/laundry room. And promptly disappears. And it isn't the obscure letter "X" or "Q". Ohhhh no…….

P6240249

It has to be the "H", wouldn't you know. The very letter that plays such a  crucial role in "Hello", and "Hi", and "tHanks", and "WitH Love", and "WitH SympatHy" – and "Happy BirtHday", which was what I was spelling at the time. Come to think of it, "H" just might even be the die I use the very most from that entire set!

Well, after 2 hours of crawling around on the floor in the middle of the night with an LED miner's light strapped to my head, I was no closer to finding that runaway "H" than at the moment I heard it go "tink". So sadly, I had to acknowledge it was time for Plan B: scrap the really cute card design that was nearly finished – and start over from scratch. Which I did ultimately do, but obviously at the expense of several hours' sleep that night.

But I'm happy to report that "H" is now back where it belongs with the rest of its "Little Letters" family.  Yesterday I emptied and pulled out 2 big cabinets (including the one that houses all my cardstock and paper) so I could crawl into the corner to access the side of the washing machine I'd been unable to reach that night. And with the assistance of this very classy, high-tech tool………….

P6230248

…….. I located and snagged that wayward puppy in a snap! I'm thinking seriously of not taking my new die-snagger tool apart, though. This is already the 2nd time I've dropped a pesky little die in that room only to have it result in a multi-hour search, and somehow I suspect it may not be the last. And perhaps it might just be easier to be prepared next time……

And speaking of being prepared, I'll share again how handy it is to use magnets with these dies. Not only do I use the magnet platform in my Big Shot, but I store the entire set of "Little Letters" on a piece of 5" x 6" black magnet, and it was 2 strips of magnets that I'd glued to the wooden stick (one on either side of it) that allowed me to rescue this little 3/4" escapee from under the washer. If you don't have any left-over magnet material from when we carried it in the Stampin' Up! line a while back, you can find a couple of sheets in a package in most any kind of craft or home-improvement store. (I get mine at W**mart nowadays.)

Anyway, now that my cabinets and drawers are again replaced and refilled (and cleaned, btw), I think I'll wait another couple of days before I get brave enough to handle one of these tiny little dies again. But I WILL use them again; they're just TOO sweet and adorable NOT to!

Dad’s Day

So the other day I found myself staring at my never-used, still-shrink-wrapped (although already retired) Adventure Bound Designer Series Paper Stack. Considering it was one of the very first things I'd ordered from the 2015 Occasions Catalog, and I still love its images so much, why in the world had I not even opened it?!?

Well, the answer to that is a bit complicated, but suffice it to say that when my gaze landed on it the other day, I happened to be in the "gotta make a Father's Day card" mode. And I knew this paper would be perfect. So if you promise to keep this just between you and me (and since I'm pretty sure Dad never looks at my blog, lol), I'll share my results. 

P6170241---web---copyright

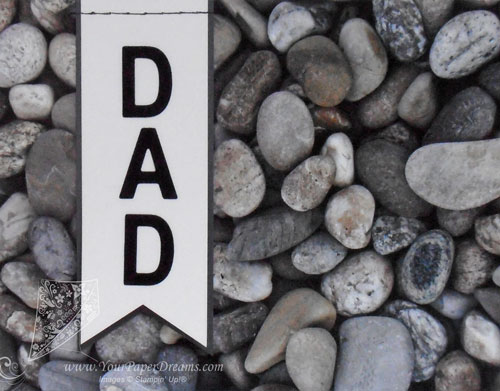
I knew I wanted something a little more creative than just a piece of pretty paper stuck on the front, so I started with one of my "go to" tips for creating "guy" cards: "Stick to neutrals", and then built from there. I already knew I was headed for a tri-fold of some kind. For this color palette: Basic Black, Basic Gray, Smokey Slate and Whisper White. I spelled out "Dad" with one of my most-reached-for die sets – "Little Letters Thinlits".

The double-layer banner is from the brand-new "Triple Banner" punch. BTW, did you know you don't HAVE to stick to only the 3 widths of paper they mention in the catalog for that punch?!? You can probably see that I didn't.

I did some faux stitching across the top of the banner using the piercing tool, Updated Essentials pack & a black marker. (I actually had the Project Life markers at my fingertips, so I used the smaller of the pair, but I'm sure the Basic Black Stampin' Write marker would have worked fine, too.) Used the marker not only on the outside, but the inside, too – so the stitching actually does look reasonably realistic.

P6170244---web---copyright P6170243---web---copyright


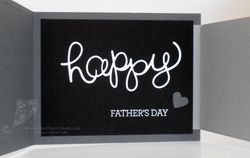
Both the big  "Happy" and "Father's Day" are from the "Crazy About You" bundle. I truly believe that the stamp set "Crazy about You" belongs in every stamper's collection, and you might as well toss in the dies and get a discount, too.  I've certainly ended up using mine more than I thought I would. Tip: Adhere the die-cut word with 2-way glue pen, but work quickly so it doesn't dry on ya.  "Father's Day" is stamped and embossed in Whisper White.

And the little punched heart for subtle embellishment? Our retired "small heart" punch. While I love the newer sweet-heart shape, there are just certain times you need a small basic heart shape. So that's ONE punch that won't be showing up at my Crafter's Garage Sale on Friday!

Cutting dimensions are:

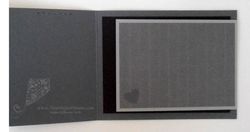
  • Adventure Bound DSP (front): 5-1/2" x 4-1/4"
  • Adventure Bound DSP (inside): 4-1/2" x 3-1/4"
  • Basic Gray card base: 11" x 4-1/4"…. scored & folded at 5-1/2"
  • Smokey Slate right-hand panel: 5-1/2" x 3-1/2"…. scored & folded 3/4" from one end.
  • Basic Black liner: 5" x 3-3/4"
  • Scrap of Whisper White large enough for the die: approx 4-1/2" x 2-1/2"

Now remember, this is still just our private secret until Father's Day, right? Shhhhh…….

Product List

Small Heart Punch

Small Heart Punch
[117193]


2015 – 2016 Annual Catalog goes live today

Annual15_Cover

Well, we've waited a long time, but it's finally official! The 2015 – 2016 Annual Catalog is available to order from today! And along WITH this brand-new catalog, you can also order from the outgoing Annual Catalog (inventory that's left, that is), as well as the outgoing Occasions Catalog. TODAY only, however…… because beginning tomorrow, June 3rd, only the New Catalog products will be available.

So today's the sweet spot: 3 Catalogs' worth of projects to choose from, OLD prices (beat the price-increases), and OLD host plan (somewhat more generous at lower sales total levels). 

A few quick tips if you're ordering today (June 2nd): 

  • If you're looking for something that's not carrying over to the new catalog it won't show in the online store just by browsing. Instead, you'll need to perform a "search" to find it in the database. That's because the online store has already been set up with categories that are pertinent only to the new catalog going forward. So search by a single word at a time until you find what you're looking for. (For instance, I located the entire group of MDS digital downloads by performing a search on the word "digital" this morning.) If you know the product code of your desired product, that will certainly be the quickest route. 
  • Originally scheduled to expire on May 31st, all MDS elements were given a short reprieve, so they'll still be available for purchase through today only. (Still at 30% off.) But they must be downloaded and saved to your computer by June 9th. That is the "revised" last date of support for MDS…… meaning the download manager system, MyDigitalStudio.net, software support, YouTube and Pinterest, etc. will not be available after the 9th. DON'T lose your digital downloads! Make certain to have them all downloaded and saved to your computer by the 9th, and make sure your MDS software is updated, too, if you will continue using it. (For another option, read here.)
  • The online ordering system will go down for maintenance tonight at midnight (Mountain Time). If you are in the Pacific Time zone (or later), be sure to take YOUR time zone into consideration. For example, if you're in Pacific Time Zone, it'll be 11 pm when the system goes down. Be sure to have your order completed and submitted before then.

Thanks for another great Stampin' Up! year, and I look forward to the adventures and fresh, new changes this upcoming year will bring!  

MDS – a last-minute update

So today is May 31st.

The day that MDS (and all its related elements) was *supposed* to sail away into the sunset. Well, not sail away as in "quit working", but the last day for the software and digital downloads to be available for purchase or download, and the last day to upload completed projects for printing or to get support for your software.

MDS to MyMemories transition

But we MDS fans have been handed a tiny bit of a reprieve: the "last day" for availability has been extended to June 2nd (note that's only a whole whopping 2 days, lol), and support will be available until June 9th.

Hopefully you're all "set" and ready for the transition, but if not, you've still got 2 more days to purchase or update your software…. and purchase, download and save your digital images. And don't forget that everything's available for 30% off as it's closing out! Here's the list of included elements if you'd still like to grab something.

You can read more nitty-gritty details in this lengthy newsletter I sent to MDS fans a couple months ago.

MDS & Digital Project Life

In the meantime, I've since learned (through personal experience) a couple of other tips I'd like to pass along regarding using Digital Project Life by Stampin' Up! – with MDS. If there's ANY chance that that's something you might ever like to do someday, I urge you to do these things right now:

  • Purchase and download the Simply Life photo templates. While not "official" Project Life page templates, they're very similar and I'm finding they work just fine. (And OH SO MUCH EASIER than messing around with Photoshop Elements to try to create a page!) Also at 30% off right now, you can get your Simply Life photo templates very inexpensively right here.
  • Then go here to purchase any of the Project Life by Stampin' Up! digital card sets you might like to have. May I recommend the beautiful and versatile black & white "Love Story" set???  Wedding theme or not, you'll find plenty of uses for it, I'm sure!
  • And THEN download your digital cards in "other" format! The reason for doing that is that your Simply Life layout templates are set up to accept "photos" in their photo boxes. But if you download the digital cards the usual way for Windows or Mac, they will install as "embellishments"….. and you won't be able to just click and drag them into your photo boxes. But instead, when you download them with the "other" option, you can create a folder on your hard drive wherever you wish, and store the images there exactly as if they were photos; then to use them you'll just navigate to that "photo" folder (from within MDS), and treat the images as any ol' photo by clicking and dragging them into place on your page. Slick as a whistle! Now, since it doesn't cost you any more than a couple of minutes, I *also* recommend you download them for Windows or Mac, too…. just because you're probably used to that, and the "stamp" images will still work as usual. But by also choosing to download as "other" you can click & drag to place your "cards" and make your Project Life scrappin' go lickety-split!
  • And finally, to continue scrapping with Digital Project Life, I think that going forward, the future Stampin' Up! card sets will be available in digital format at ProjectLife.com. (Becky Higgins' site.)

Moving on from MDS

MDS to MyMemories transition
And when the time comes that you're ready to move on from MDS for whatever reason, remember that MyMemories is offering a transition special for THEIR software, which supposedly is very similar. I have no personal experience with MyMemories because I'm opting to stay with MDS at least for a while longer, but you can read all about the MyMemories transition offer here.

So here's to digital designing for some time to come! I STILL believe there's a market for simple digital design, and think MDS had everything going for it and was without a doubt the EASIEST and BEST system for digital scrapping and design out there….. except it was just a touch ahead of the marketplace. Sadly, the public hadn't quite caught up to it yet. Darn.

Tape It – Better late than never

  Tape It Gift Bag

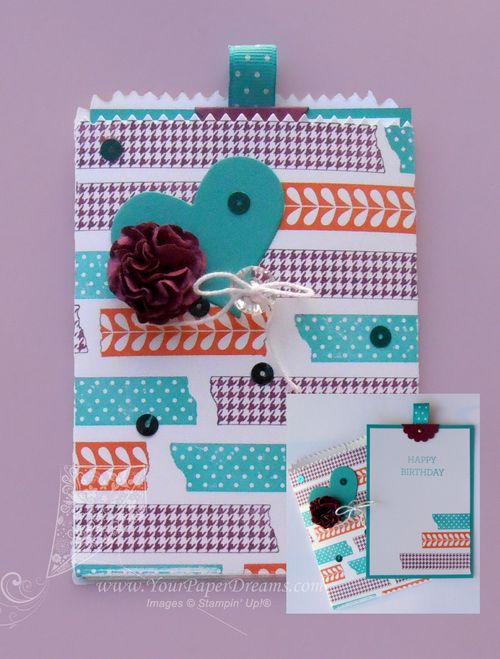
 So wouldn't you know that as soon as I received my long-desired stamp set "Tape It", it landed on the retiring list! Thankfully I was able to squeeze it into one card class, and then that card inspired THIS project. I LOVE this stamp set! It's so versatile, so forgiving and easy to work with, and I only wish I had more time to experiment with other color combos!

For this project, I paired "Tape It" with another product I'm currently passionate about – the "Mini Treat Bag Thinlits Die" (which thankfully ISN'T retiring). Colors are Bermuda Bay, Tangerine Tango and Rich Razzleberry…. all from the Brights Color Collection.

For the basic construction I cut both pieces of the bag and attached them together to make one flat surface….. and then stamped onto that in a random color pattern before assembling the rest of the way. I decided not to obsess over the fact that the images don't line up at the seam in the back (although I suppose I COULD have fussed with my grid paper and Stamp-a-ma-jig has I wanted to obsess), and I particularly love that this design is forgiving when the individual stamped images aren't even straight! The card inside measures 3-1/2" x 5".  (Oh, and the little loop of Bermuda Bay ribbon on top is retired, but of course you could use any ribbon you've got handy.)

Finally, I dressed it up with a paper flower, a heart cut from the same die set, a vintage button and some fun matching sequins.

And perhaps the coolest thing about this type of card/bag combo? Without quite as many lumpy-lumps as this one has, it would fit into a regular envelope for mailing…. even without any extra postage!

Product List