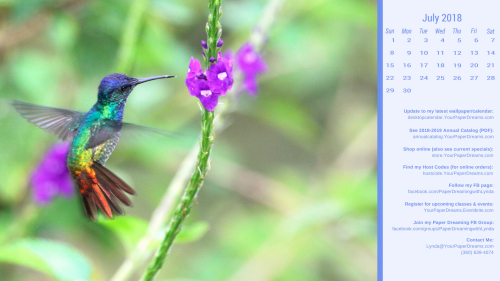
July’s desktop wallpaper/calendar is ready to download

2018 - 7 - July - tinifiedjpg

Hummingbirds. Are you as fascinated by their tiny bodies and silly aerial antics as I am?

For many years my parents kept multiple hummingbird feeders in their yards and we loved to watch from inside the house, or even head outside to see if we could get one of the little guys to alight on us. Alas, I never accomplished the latter, but I did get dive-bombed plenty of times. I remember one particular male hummer who had decided a specific feeder was his. And his alone. And while he visited it often throughout the day for nourishment, he also spent most of the rest of the day sitting on a special "look out" tree branch with attention focused directly on "his" feeder. Then, whenever another hummer dared to approach "his" feeder he'd swoop over and chase the interloper away, only to circle back to his private perch and resume his guard. His mama had definitely not taught him the concept of sharing!

My monthly desktop wallpaper background not only offers you a pretty seasonal picture to brighten your computer monitor, but also includes a handy monthly calendar and serves as a cheat sheet reference to websites you may want to know about and visit.  And it's even FREE to download and install, so please don't hesitate to share this page with your friends and family.
 
 
You'll probably want to consult your own computer operating system's installation instructions, but installing the background image on my Windows 10 system takes just 3 quick steps – and less than a minute. It's super-duper easy-peasy!
  1. I download and save the image to my computer - from the link just above that starts with "Click HERE". (NOT from the picture that appears at the top of this post!)  TIP:  To "download" the full-resolution image once it's open (from Google Drive where it's stored), I click on the downward-pointing arrow. THAT is what actually begins the download process to my computer.
  2. Once the file has been downloaded, named and saved to my computer's hard drive, I open it. 
  3. Then I right-click on the image and select "Set as" > "Set as Background"….. then right-click again and select "Set as" > "Set as Lock screen". And poof! That's all there is to it! (For convenience, I install this on both my desktop system as well as my laptop.)
And in case you may have an operating system OTHER than Windows 10, these tips may help with installation:
 
Finally, please keep in mind that the format of my monthly picture is designed for most modern-day 16:9 monitors (common format for monitors and HD TV's since about 2009), oriented in landscape format. (1920 x 1080 pixels.) If you're working with an older monitor (one that is more square-ish in format), or your monitor is set up in portrait format, the picture will probably not work for you. Sorry 'bout that.

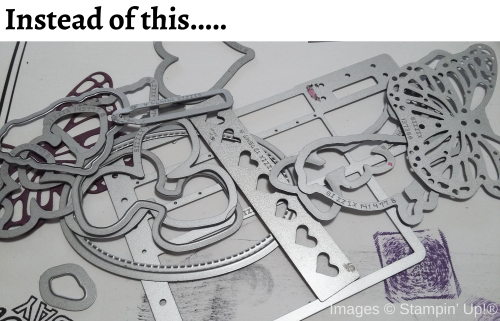
How to wrangle your thin dies – Part 1

If you're like me, you probably love the added dimension and interest that Stampin' Up!®'s dies add to your papercrafting. But you may also wish to skip some of the potential headaches that can arise when trying to keep all those frustrating little bits of metal under control! Today I'll be sharing some of my tips for handling and storing dies with minimal frustration.

Tip #1: Always put each die away immediately after using it.

LOL!

OK, who are we kidding here!?! WHAT serious papercrafter actually takes the time in the middle of his/her creative "zone" to put away every single tool one-by-one?!? Pretty inefficient, if you ask me…. 'cuz not only are you risking losing your creative mojo, but you just might need to use that exact same tool again only 14 seconds from now, right?!?

Ok. So let's start over, but this time we'll add in a dose of reality. Here's my approach:

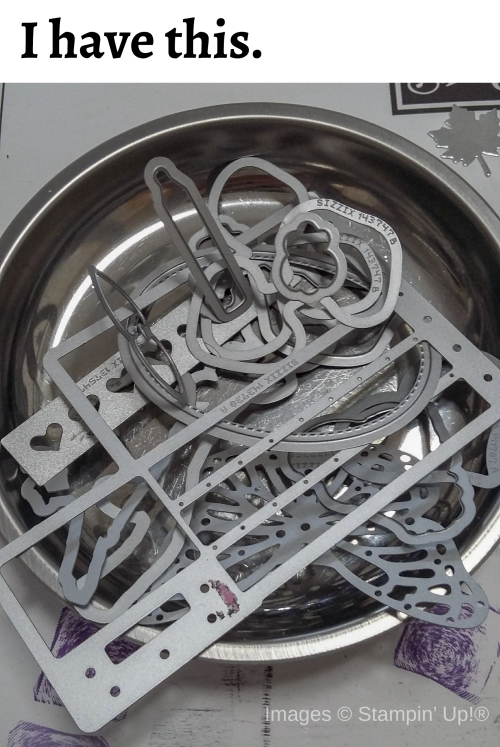
I recognize that while I'm creating, things WILL be out of place. So I try to be ok with that. But that doesn't mean my workspace has to devolve into total chaos; my goal is to keep things at least moderately corraled so they don't get lost or damaged, and they can be returned to their rightful places with minimal effort and headache later. So while I'm working… 20180623_140226

20180623_140349

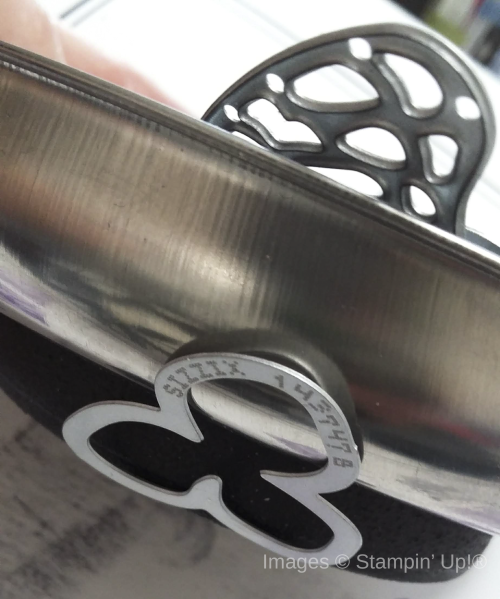
This awesome tray was given to me by a friend. But it's easily found at Harbor Freight, and it's easy on the budget. Designed for mechanics to hold onto screws and bolts and the like, it's got a heavy magnet at the base. So it can be attached to a metal tool chest or workbench – or not. I've found that without even attaching the tray to a magnetic surface, its weight alone tends to keep it upright and unlikely to tip over with normal use. And of course, the magnet at its base keeps the dies in place inside the tray regardless.

I LOVE this tray! But there *is* one lesson I've learned while working with it. Occasionally I've found that a smallish die just disappears. Totally vanishes from my work area! One moment it's there, and a second later it's not. But I've had this happen enough times now, that before I set off on an extensive exploration of my clothing, the carpet, the wastebasket, etc., I usually just need to pick up the tray and look underneath it…

20180623_140428


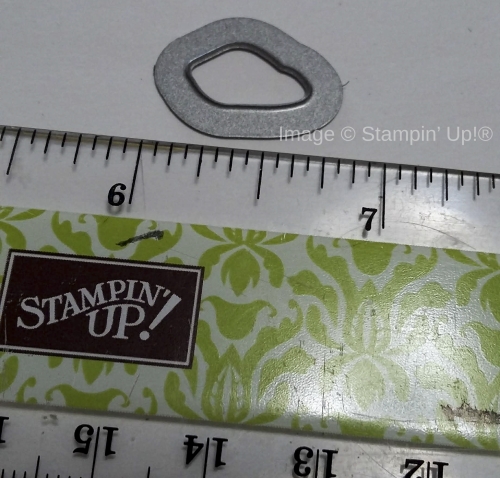
Now, has this ever happened to you? You're straightening up your workspace and come across an itty-bitty die that looks something like this.

20180623_140529

Quick now, what die set does it belong to? (Yeah, right!) Well, here's the shortcut way to find out.

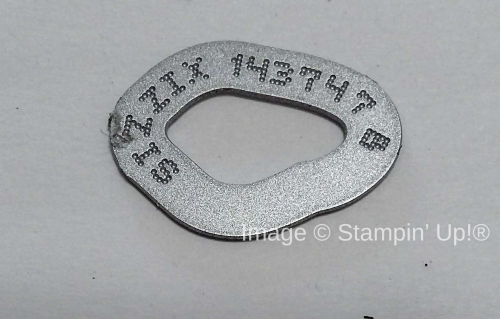
Flip it over, and …..


20180623_140545

Read the 6-digit number engraved on it. That will be the Stampin' Up! product code! If you have absolutely no idea what set it belongs to, click here (store.YourPaperDreams.com), and type that product code into the search bar. If it's still currently available, the picture and name of its die set will come up so you can reunite it with its family!

Missing die identified
But if it's not currently available, you'll have to search through your collection of die sets, looking at the product code of each set, in order to find the rest of its tribe. Tedious, yes. But at least doable!

Which brings me to the topic of how I *store* my thin dies… and why. Check out more tips in my next post!

June’s Desktop Calendar is ready for download

2018 - 6 - June - tinified
 
 
June. The beginning of summer often brings dreams of vacations and destinations. Even if you can't actually visit your dream destination this year, I hope this quiet image will offer you some moments of tranquility.
My monthly desktop wallpaper background not only offers you a pretty seasonal picture to brighten your computer monitor, but also includes a handy monthly calendar and serves as a cheat sheet reference to websites you may want to know about and visit.  And it's even FREE to download and install, so please don't hesitate to share this page with your friends and family.
 
 
You'll probably want to consult your own computer operating system's installation instructions, but installing the background image on my Windows 10 system takes just 3 quick steps – and less than a minute. It's super-duper easy-peasy!
  1. I download and save the image to my computer - from the link just above that starts with "Click HERE".(NOT from the picture that appears at the top of this post!)  TIP:  To "download" the full-resolution image once it's open (from Google Drive where it's stored), I click on the downward-pointing arrow. THAT is what actually begins the download process to my computer.
  2. Once the file has been downloaded, named and saved to my computer's hard drive, I open it. 
  3. Then I right-click on the image and select "Set as" > "Set as Background"….. then right-click again and select "Set as" > "Set as Lock screen". And poof! That's all there is to it! (For convenience, I install this on both my desktop system as well as my laptop.)
And in case you may have an operating system OTHER than Windows 10, these tips may help with installation:
 
Finally, please keep in mind that the format of my monthly picture is designed for most modern-day 16:9 monitors (a common format for monitors and HD TV's since about 2009), oriented in landscape format. (1920 x 1080 pixels.) If you're working with an older monitor (one that is more square-ish in format), or your monitor is set up in portrait format, the picture will probably not work for you. Sorry 'bout that.

Stamparatus Success Tips

Stamparatus: A *must-have* positioning tool that will change the life of any stamper. Similar to the "other brands", except this one's on steroids!

If you don't already have your Stamparatus, you'll be able to order it beginning this Friday, June 1, at store.YourPaperDreams.com (Product #146276)

Recently I've been working on another one of my "making multiples" projects and have discovered several tips that have helped me fall even deeper in love with this gizmo (didn't know that was even possible!), and I'm sure it will do the same for you, too.

20180529_190453

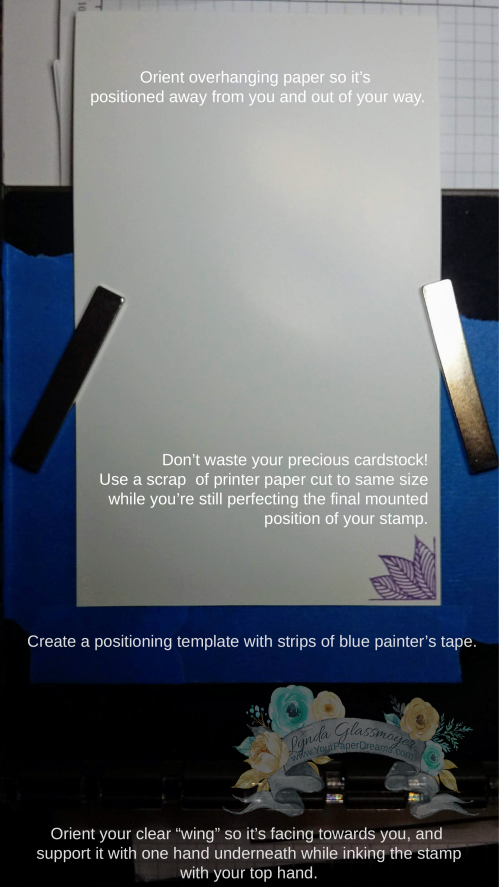
My project uses a long piece of cardstock, and images are ultimately stamped over much of its surface. Because the end has to extend beyond the surface of the platform I was finding that while I was initially using the Stamparatus in my usual orientation (clear "wings" either folding in from top or a side) I was frequently either getting unwelcome creases or ink on the extended end, just from handling the whole set-up. Given that I'm aiming to make somewhere around 100 of these eventually, that was definitely proving awkward.

So I flipped it all around…. extending the excess cardstock up at the top, facing away from me – and positioning my clear "wing" pointing towards me.  And that change alone reduced the amount of stray inky fingerprints and creases I ended up with. I found that I got more ink on the stamp (and less ink on the surrounding clear plate) by placing one hand underneath the "wing" while inking the stamp with my other hand.  And best of all I could actually see what I was doing because it was directly in front of me!

20180530_080847[1]One of the tips I'd already discovered in the past was to match the size of the ink pad to the size of the stamp. (Full-size ink pads for larger stamps and Stampin' Spots for the smaller ones.)  I already have a decent supply of Stampin' Spots from having been a Paper Pumpkin subscriber for so long, but I've also recently been filling in color gaps by making up my own Stampin' Spots in colors I've been missing. (BTW, you can order a set of empty spots here and ink them up with the refill colors of your choice. You DO already have the ink refills that match your ink pads, don't you?!?)

Since I'm doing so many of these I needed a quick and efficient way to get my cardstock lined up each time I needed to work on its other end. And 1" wide blue painter's tape proved the answer to that.  I just plopped a piece of my cut-to-size cardstock down on the platform, temporarily held it in place with magnets, and laid the painter's tape around 3 of its edges. So going forward I could just insert each piece of cardstock right into that template and anchor it with magnets. So far, the tape has held up like a charm, and it doesn't seem to leave any residue either!

And finally, just a reminder to conserve your precious cardstock while you're still designing your layout, and substitute printer paper or something else fairly cheap whenever possible instead. Personally, I use grid paper and/or printer paper for stamping on while I'm developing my layout, and modest-sized scraps of colored cardstock when pulling together colors and layers. I'll only cut a piece of colored CS to actual size once I've got the fussing-around steps mostly behind me and am pretty confident the project seems to be headed in a direction that's gonna work.

So if you don't already have your Stamparatus, mark your calendar for Friday, June 1, jump into my online store, and get one headed your way! 

Updating Stampin’ Up!’s color line

2
Well, they did it. Stampin' Up! caught me a little off guard this spring by updating their color line while my focus was on other significant things going on in my life. So I'm a little bit late to the table with this "news", but here's a quick run-down of what's up.

Every so often Stampin' Up! refreshes our color line. This is a really good thing as it keeps us on-trend and doesn't allow our color offerings to stagnate. But while my time and attention have been largely focused on other elements of life recently, I guess I hadn't really paid attention to how long it had been since we'd had a significant color update. And apparently, it was time, lol.

3

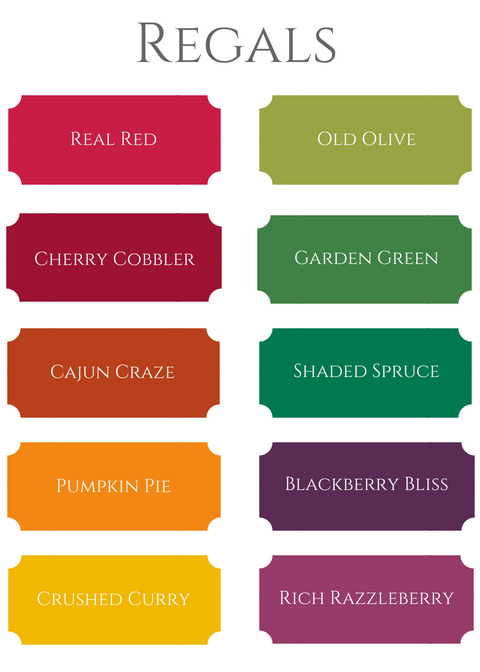
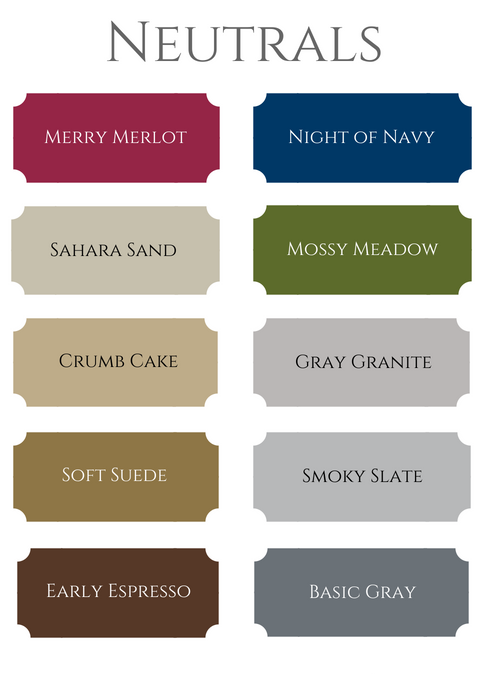
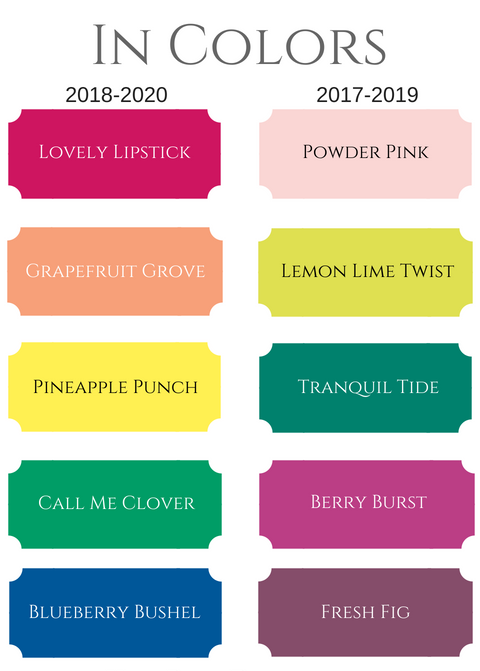
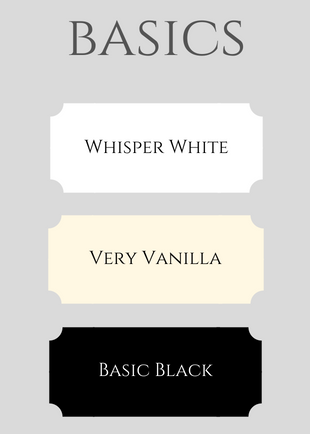
So on June 1st, with the debut of the upcoming 2018 – 2019 Annual Catalog, we'll have a shiny, new collection of colors to work with!

4
4

Here are some of the highlights of this update:

  • The In Color program will remain the same as it's been; every year 5 new colors will be introduced in the Annual Catalog, remain available for 2 years, and then retire. Given that each In Color collection has a life-span of 2 years, there will always be 10 In Colors in effect at any given time: the 5 just beginning their 2-year term, and the 5 on the 2nd year of their 2-year term. This year's new In Colors are bright and remind me of primary colors, which will be awesome for kid-themed projects and/or graduation stamping because many schools use one or more of these as their school colors!
  • 13 Core colors are retiring at the end of May (unless they sell out first, of course). (That's about 1/3 of our previous core collection.)
  • 27 Core colors (about 2/3 of our previous collection) will remain active, but individual colors may shift from one color family to another.
  • 10 Brand-new colors will join our core collections.
  • 6 Popular In Colors from previous years will return and take their places as new core colors. (Note that Flirty Flamingo is one of those colors, even though previously scheduled to retire this year as a current In Color.)
  • 3 "Basic" colors (Whisper White, Very Vanilla and Basic Black) have staged an uprising and formed their own mini color collection (called "Basics"), which leaves space for 3 MORE colors in our regular line than we've had previously! 

5

6

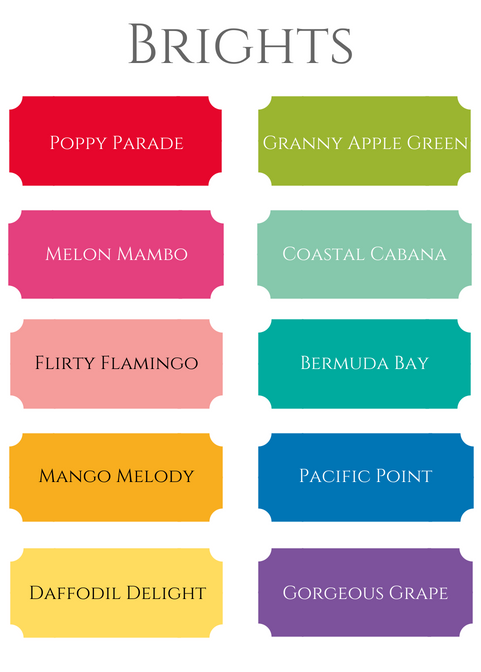
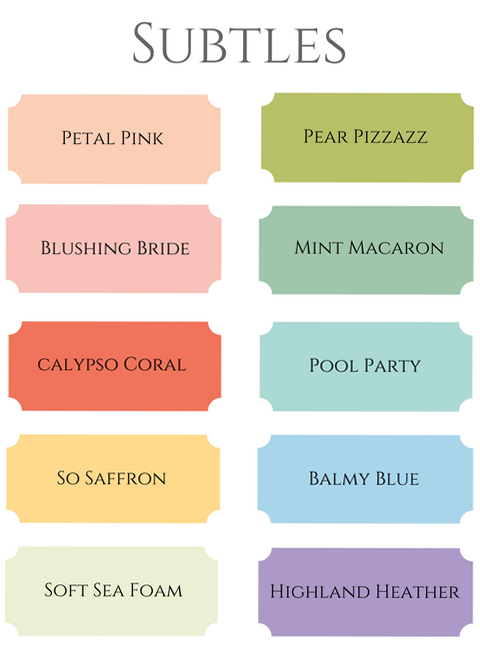
You may have heard that at the same time as these colors become effective, the ink pad cases themselves will be redesigned as well. That's true, and I'll share more information about that later. But for now, here's Stampin' Up!'s color line-up as it will stand on June 1st. If you'd like to download and study a PDF with this information you may get it here. (For best color reproduction when printing you may wish to print onto photo paper using your printer's "best" setting.)

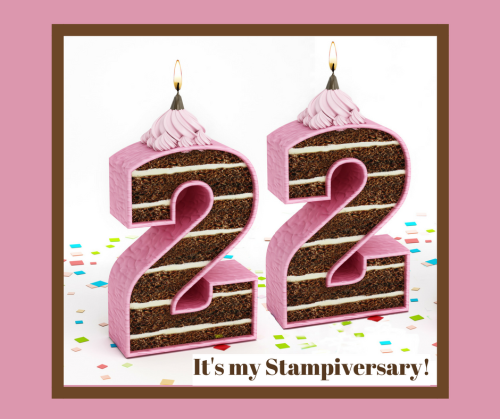
22 years as a Stampin’ Up!® Demonstrator!

My stampiversary
Today I admit to feeling a little old. Not necessarily "old" in a bad way, but rather, "old" in an "I've sure been fortunate to have been a part of a whole lot of something special" kinda way.

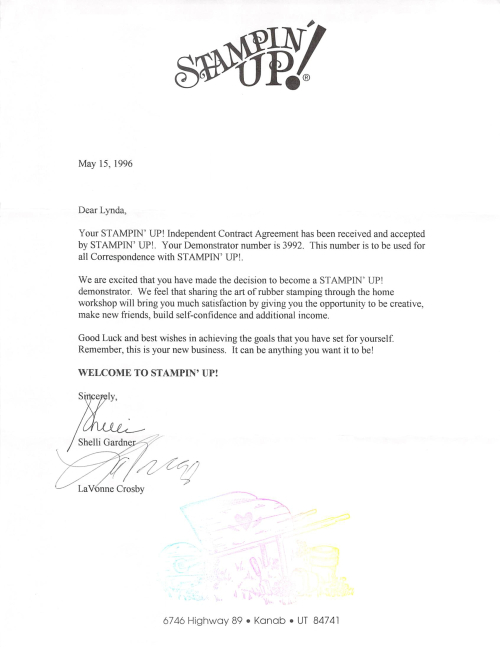
You see, 22 years ago today Stampin' Up! accepted my application to become a demonstrator with their almost 8-year-old rubber stamp company. Little did I know at the time what a profound effect my decision would have on the course of the next 1/3 of my life!

Deciding to join Stampin' Up! didn't really take me very long, actually. I'd only been introduced to rubber stamp art fewer than 4 months earlier (yes, not surprisingly at a Stampin' Up! home workshop I'd been invited to), and I joined for the exact same reason most demonstrators still join today:  to get a discount on my own future orders. Back in 1996 "joining" amounted to signing an application (yes, a paper application that you had to send through the mail because there was no such thing as a Stampin' Up! website yet), and enclosing a check for $350 or so for one's "Starter Kit"…… which consisted of a pre-determined collection of stamps (some wood mount, and some "foam"; the latter of which I hated and eventually threw out without even opening or using, lol), along with a few accessories, some business supplies and a printed copy of the "Demonstrator Manual".) Contrast that to today's starter kit, where each new demonstrator gets to select up to $125-worth of current product of her own choosing, and only pays $99 plus tax!

  2018_05_09_15_13_520001

I was assigned demonstrator number 3992, meaning at the time that I was the 3,992nd demonstrator to join the company. By contrast, today's demonstrator numbering system does not have a similar meaning; the numbering system was changed up entirely quite some time ago to include many more digits in the more "modern" numbers, but I'm super thankful they allowed us "oldies" to retain our original numbers. Four digits are so much easier to remember and faster to type!

I'm also immensely grateful for how long we "oldies" have stayed with the company. While my 2nd-level upline eventually moved on, my immediate and 3rd level uplines are still active, and I think my 4th level is, as well. Lots of significant life changes among us, but we're still here!

Notice how "back in the day" my acceptance letter bore the signatures of Stampin' Up!'s co-founders: Shelli Gardner and her sister LaVonne Crosby, and it also featured an image hand-stamped with what was commonly known as a "Rainbow Pad". (When you get a chance to look at your new 2018-2019 Annual Catalog, you'll understand why I'm smiling as I mention that "Rainbow Pad".) 

Fast-forwarding through the years, those of us who've been with Stampin' Up! for most of their 30 years (come this October) have really seen a lot of changes! The first major whopper was when it was announced at our 1997 Convention that we would be going "exclusive" with our stamps and colors. You see, prior to that point Stampin' Up! carried stamp designs and supplies from a number of other rubber stamp companies; quite a different focus from the company most know today!

Since that time, Stampin' Up! has continued to be both a pioneer and leader in the rubber stamp art industry, introducing the concept of coordinating colors across inks, cardstocks, markers and other accessories, as well as multi-step stamping (we call it "2-step Stampin' ", even though there are often more than 2 images used nowadays), and ultimately coordinating stamp images and dies. There are a lot more choices in the rubber stamping market place now than there used to be, and a lot of today's companies have benefited from Stampin' Up! demonstrators having introduced the hobby to the masses, thereby paving the way for the options and tools that today's stampers appreciate.

Remember how I mentioned I joined for the discount? Well, I'll let you in on a little secret; I also joined with my quitting date already on the calendar. My brilliantly thought-out plan was to purchase $100 in product each month for 6 consecutive months and then quit because I would obviously have all the stamping supplies I would ever need. But I often admit that I made a serious mistake on the way to my quitting date; I signed up for and attended Convention within 2 months of joining. And while there, I came to understand and fall in love with Stampin' Up!'s philosophy, vision and ethics. And instead of coming home and quitting, I came home and hosted an open house that qualified me for my first promotion! Suddenly I was "in business", and here I am 22 years later….. still doing what I love, and loving what I do.

Will I be able to continue teaching stamping for another 22 years? Only time will tell, but I sure intend to hang with it as long as I'm physically able. When I think of all the people who've come into my life and blessed me with their friendship over these past 2+ decades, nearly all of them have been because of my association with Stampin' Up! in one way or another. I can't imagine ever giving that up willingly!

May’s desktop wallpaper and calendar image is ready to download

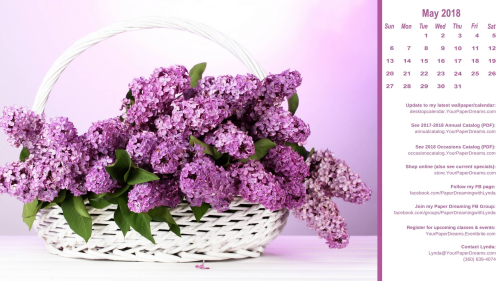
2018 - 5 - May - tinified
I've been in love with lilacs as far back as I can remember. In fact, I remember hosting a party for friends when we were in 5th grade, and I filled the room with armloads of lilacs from our bushes out back. And to this day, when I think of a traditional "May" flower, the first thing that comes to mind is the lilac with its intoxicating sweet scent. Happy MAY!
 
My monthly desktop wallpaper background not only offers you a pretty seasonal picture to brighten your computer monitor, but also includes a handy monthly calendar and serves as a cheat sheet reference to websites you may want to know about and visit.  And it's even FREE to download and install, so please don't hesitate to share this page with your friends and family.
 
 
You'll probably want to consult your own computer operating system's installation instructions, but installing the background image on my Windows 10 system takes just 3 quick steps – and  less than a minute. It's super-duper easy-peasy!
  1. I download and save the image to my computer - from the link just above that starts with "Click HERE". (NOT from the picture that appears at the top of this post!)  TIP:  To "download" the full-resolution image once it's open (from Google Drive where it's stored), I click on the downward-pointing arrow. THAT is what actually begins the download process to my computer.
  2. Once the file has been downloaded, named and saved to my computer's hard drive, I open it. 
  3. Then I right-click on the image and select "Set as" > "Set as Background"….. then right-click again and select "Set as" > "Set as Lock screen". And poof! That's all there is to it! (For convenience, I install this on both my desktop system as well as my laptop.)
And in case you may have an operating system OTHER than Windows 10, these tips may help with installation:
 
Finally, please keep in mind that the format of my monthly picture is designed for most modern-day 16:9 monitors (common format for monitors and HD TV's since about 2009), oriented in landscape format. (1920 x 1080 pixels.) If you're working with an older monitor (one that is more square-ish in format), or your monitor is set up in portrait format, the picture will probably not work for you. Sorry 'bout that.

April’s desktop wallpaper and calendar image is ready to download

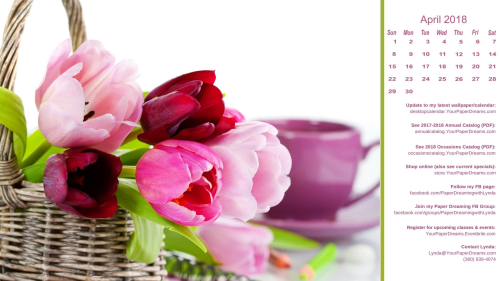
  2018 - 4 - April - tinified

Happy Easter! I hope you get to enjoy the day with your loved ones, and that the true meaning of the day brings you peace and hope.

I've chosen tulips for this month's desktop wallpaper…. a fond memory I still hold from my days living close enough to the Skagit Valley in Washington to be able to enjoy their amazing fields awash in color during the annual Tulip Festival each April. I hope when you sit down each morning with your cup of coffee and fire up your computer, that these tulips will make you smile and fill your soul with light.

My monthly desktop wallpaper background not only offers you a pretty seasonal picture to brighten your computer monitor, but also includes a handy monthly calendar and serves as a cheat sheet reference to websites you may want to know about and visit.  And it's even FREE to download and install, so please don't hesitate to share this page with your friends and family.
 
 
You'll probably want to consult your own computer operating system's installation instructions, but installing the background image on my Windows 10 system takes just 3 quick steps – and  less than a minute. It's super-duper easy-peasy!
  1. I download and save the image to my computer - from the link just above that starts with "Click HERE". (NOT from the picture that appears at the top of this post!)  TIP:  To "download" the full-resolution image once it's open (from Google Drive where it's stored), I click on the downward-pointing arrow. THAT is what actually begins the download process to my computer.
  2. Once the file has been downloaded, named and saved to my computer's hard drive, I open it. 
  3. Then I right-click on the image and select "Set as" > "Set as Background"….. then right-click again and select "Set as" > "Set as Lock screen". And poof! That's all there is to it! (For convenience, I install this on both my desktop system as well as my laptop.)
And in case you may have an operating system OTHER than Windows 10, these tips may help with installation:
  1. Windows 10, 8.1 or 7: http://www.digitalcitizen.life/how-customize-desktop-background-windows 
  2. Apple Mac: http://www.wikihow.com/Change-the-Desktop-Background-on-an-Apple-Macintosh-Computer 
 
Finally, please keep in mind that the format of my monthly picture is designed for most modern-day 16:9 monitors (common format for monitors and HD TV's since about 2009), oriented in landscape format. (1920 x 1080 pixels.) If you're working with an older monitor (one that is more square-ish in format), or your monitor is set up in portrait format, the picture will probably not work for you. Sorry 'bout that.

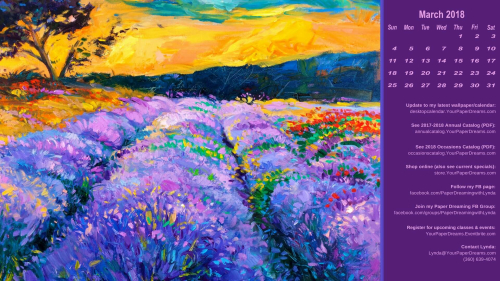
March’s desktop wallpaper and calendar image is ready to download

2018 - 3 - March - tinified
 
If this seems a bit late, you're right! This is getting posted much later in the month than I aim for.
 
Two reasons, actually. The most recent is because once I had this all written, tested and proof-read the other day, the system burped and the whole thing completely disappeared. And my schedule at the time didn't allow me to start all over and re-write it just then.
 
But backing up to the days prior to that, I'd been having a particularly difficult struggle deciding what image to choose for this month. The battle in my head had been going something like this:
 
"Ok, Lynda, it's time for the March image. Ordinarily you'd be thinking about Easter for your seasonal design. Baby chicks, bunnies, baskets, spring flowers, that sort of thing. But Easter isn't actually until next month, and on the very first day, at that. Which means that by only the 2nd day of April any chicks, bunnies and related baskets will be basically outdated."
 
"Hmmm…. tough one."
 
"Oh I know! March! Comes in like a lion and goes out like a lamb. YES! That's what I'll choose….. lambs! Lambs are born in the spring, they're adorable and definitely 'awww-worthy', and while I can't be certain everyone will get the lion/lamb/March connection, just their sweet faces should bring a smile anyway."
 
But…
 
I still couldn't run with it.
 
Because when I got right down to being really honest with myself, my heart just wasn't into sweet and adorable critters prancing around in a meadow right now. My heart was actually with PurpleLadyLoretta, my beautiful mom. My mom who'd passed away just the week before. And what my heart really needed to create was a tribute to her.
 
So Mom, this one's for you.  You always loved the warmth of the sun on your skin, bright blue skies, the sharp lines of rocky hills contrasting with gentle fields of flowers, and how the Whidbey gray would often open up a narrow window right along the western horizon late in the afternoon – just in time to reveal a momentary glimpse of God's spectacular sunsets. 
 
Mom was probably my biggest fan when it came to these monthly wallpapers I design, and she was always thrilled when I'd load a bright, new image onto her computer every month. I've always suspected that part of that was her love for vibrant color. 
 
Mom's mother was an artist, and while Mom never felt she'd inherited Grandma's ability to paint or draw, she did inherit her appreciation for color. Bright color, and lots of it. Mom's love for color showed up everywhere:  in her wardrobe, in the flowers she chose, in table settings for parties and gatherings she loved to host, and through every layer of her home decor.
 
Some of her most joyous memories were of the years she and Dad crewed for hot air balloon teams. And what makes a grander display of color than a giant field littered with dozens (or even hundreds) of hot air balloons?!?
 
But purple reigned as her favorite. And over the years I can recall purple appearing on her bathroom walls, in her linens and dishes, and of course in many of the art pieces she surrounded herself with. Fragrant lavender lined her garden, and even her car sported some version of lavender. (Actually, the official paperwork on that car defines its color as "Opal", but anyone looking through human eyes, rather than marketing eyes, recognizes that color as lavender.)
 
And a quick peek inside her closet revealed that purple dominated there, too.
 
Mom spent much of her life helping to better other people's lives. She volunteered for and held board positions in a number of organizations whose missions were about helping others. She clothed children in need, and she and Dad delivered Meals on Wheels for many years. When she heard of a family going through a difficult time, she'd prepare and deliver a meal for them. And until her final months she always had birthday cards and thank-you cards in the mail on time…. a feat I'll *never* be able to accomplish. One didn't really have to know Mom very well to recognize the "Purple" part of her gmail handle, but those who *did* know PurpleLadyLoretta will understand the "Lady" part, too.
 
Loretta Collage - 2
   
My monthly desktop wallpaper background not only offers you a pretty seasonal picture to brighten your computer monitor, but also includes a handy monthly calendar and serves as a cheat sheet reference to websites you may want to know about and visit.  And it's even FREE to download and install, so please don't hesitate to share this page with your friends and family.
 
 
You'll probably want to consult your own computer operating system's installation instructions, but installing the background image on my Windows 10 system takes just 3 quick steps – and  less than a minute. It's super-duper easy-peasy!
  1. I download and save the image to my computer - from the link just above that starts with "Click HERE". (NOT from the picture that appears at the top of this post!)  TIP:  To "download" the full-resolution image once it's open (from Google Drive where it's stored), I click on the downward-pointing arrow. THAT is what actually begins the download process to my computer.
  2. Once the file has been downloaded, named and saved to my computer's hard drive, I open it. 
  3. Then I right-click on the image and select "Set as" > "Set as Background"….. then right-click again and select "Set as" > "Set as Lock screen". And poof! That's all there is to it! (For convenience, I install this on both my desktop system as well as my laptop.)
And in case you may have an operating system OTHER than Windows 10, these tips may help with installation:
  1. Windows 10, 8.1 or 7: http://www.digitalcitizen.life/how-customize-desktop-background-windows 
  2. Apple Mac: http://www.wikihow.com/Change-the-Desktop-Background-on-an-Apple-Macintosh-Computer 
 
Finally, please keep in mind that the format of my monthly picture is designed for most modern-day 16:9 monitors (common format for monitors and HD TV's since about 2009), oriented in landscape format. (1920 x 1080 pixels.) If you're working with an older monitor (one that is more square-ish in format), or your monitor is set up in portrait format, the picture will probably not work for you. Sorry 'bout that.
Hey, Lynda! Where’s the March wallpaper/calendar?

Just a quick note to let you know I have designed the wallpaper/calendar image for March, and wrote a good, long explanation all about it, and then as I was all done tweaking and proofing it, the system burped and an entire morning's worth of work all went "bye-bye". Grrr!!!! And unfortunately right now I don't have time to re-write the whole thing from scratch, but will do so as soon as I'm able. I apologize for this delay!