Stamparatus: A *must-have* positioning tool that will change the life of any stamper. Similar to the "other brands", except this one's on steroids!
If you don't already have your Stamparatus, you'll be able to order it beginning this Friday, June 1, at store.YourPaperDreams.com (Product #146276)
Recently I've been working on another one of my "making multiples" projects and have discovered several tips that have helped me fall even deeper in love with this gizmo (didn't know that was even possible!), and I'm sure it will do the same for you, too.
My project uses a long piece of cardstock, and images are ultimately stamped over much of its surface. Because the end has to extend beyond the surface of the platform I was finding that while I was initially using the Stamparatus in my usual orientation (clear "wings" either folding in from top or a side) I was frequently either getting unwelcome creases or ink on the extended end, just from handling the whole set-up. Given that I'm aiming to make somewhere around 100 of these eventually, that was definitely proving awkward.
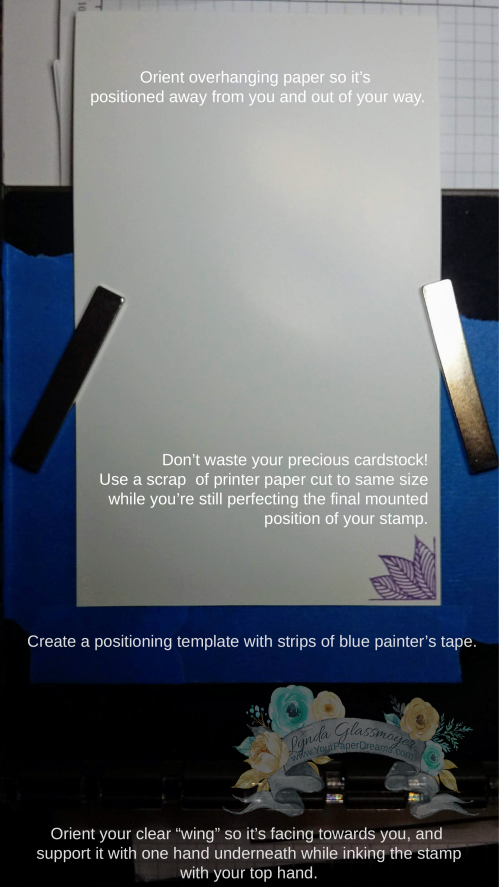
So I flipped it all around…. extending the excess cardstock up at the top, facing away from me – and positioning my clear "wing" pointing towards me. And that change alone reduced the amount of stray inky fingerprints and creases I ended up with. I found that I got more ink on the stamp (and less ink on the surrounding clear plate) by placing one hand underneath the "wing" while inking the stamp with my other hand. And best of all I could actually see what I was doing because it was directly in front of me!
![20180530_080847[1] 20180530_080847[1]](http://box5250.temp.domains/~paperdr6/wp-content/uploads/2018/05/6a00d83494abd653ef0223c84f24f1200c-320wi.png) One of the tips I'd already discovered in the past was to match the size of the ink pad to the size of the stamp. (Full-size ink pads for larger stamps and Stampin' Spots for the smaller ones.) I already have a decent supply of Stampin' Spots from having been a Paper Pumpkin subscriber for so long, but I've also recently been filling in color gaps by making up my own Stampin' Spots in colors I've been missing. (BTW, you can order a set of empty spots here and ink them up with the refill colors of your choice. You DO already have the ink refills that match your ink pads, don't you?!?)
One of the tips I'd already discovered in the past was to match the size of the ink pad to the size of the stamp. (Full-size ink pads for larger stamps and Stampin' Spots for the smaller ones.) I already have a decent supply of Stampin' Spots from having been a Paper Pumpkin subscriber for so long, but I've also recently been filling in color gaps by making up my own Stampin' Spots in colors I've been missing. (BTW, you can order a set of empty spots here and ink them up with the refill colors of your choice. You DO already have the ink refills that match your ink pads, don't you?!?)
Since I'm doing so many of these I needed a quick and efficient way to get my cardstock lined up each time I needed to work on its other end. And 1" wide blue painter's tape proved the answer to that. I just plopped a piece of my cut-to-size cardstock down on the platform, temporarily held it in place with magnets, and laid the painter's tape around 3 of its edges. So going forward I could just insert each piece of cardstock right into that template and anchor it with magnets. So far, the tape has held up like a charm, and it doesn't seem to leave any residue either!
And finally, just a reminder to conserve your precious cardstock while you're still designing your layout, and substitute printer paper or something else fairly cheap whenever possible instead. Personally, I use grid paper and/or printer paper for stamping on while I'm developing my layout, and modest-sized scraps of colored cardstock when pulling together colors and layers. I'll only cut a piece of colored CS to actual size once I've got the fussing-around steps mostly behind me and am pretty confident the project seems to be headed in a direction that's gonna work.
So if you don't already have your Stamparatus, mark your calendar for Friday, June 1, jump into my online store, and get one headed your way!


